
CI/CD Pipeline Powered by Turbo-Charged Lego People (📷 Lewis Tse Pui Lung)
📖 Definition
“CI/CD [Continuous Integration and Continuous Delivery] is a method to frequently deliver apps to customers by introducing automation into the stages of app development” — redhat.com
💧 Getting Our Feet Wet
Releasing software manually is about as fun as stepping in gum every day for the rest of your life. Manual releases are time-consuming, prone to mistakes, and a total buzzkill. Modern tools make releasing new versions of your software easy as pie 🥧.
In this article we’re going to outline the following:
🏊 Create a CI/CD-friendly workflow
🚴 Publish the library to npm
🏃 Deploy the sample to GitHub Pages
For a reference implementation that demonstrates how to publish an Angular Library with a corresponding sample application, please check out ngx-toggle.
🤿 Diving In
A few terminal commands are all it takes to create a new Angular library. First, create a new project using @angular/cli:
ng new ngx-toggle --no-create-application
Next, create a new library:
ng g library ngx-toggle
Finally, create a sample so you can show off your library:
ng g app ngx-toggle-example
For more information on how to create Angular libraries please see the official Angular docs.
🏊 Keep Swimming
Once you’ve created a library the next step is to configure your workflow so that it plays nicely with an automated release process.
By following specific conventions when authoring commit messages you can leverage semantic-release to increment your package’s version, generate release notes, and publish to npm. Semantic-release relies on the Conventional Commits standard to work its magic.
Enforcing Conventional Commits manually is a tall order. Instead, let’s use Husky and commitlint to reject commit messages that don’t meet specific criteria.
Let’s get to work! First, install the aforementioned packages:
npm i -D husky @commitlint/cli @commitlint/config-conventional
Create a .commitlintrc.js file at the root of the project that instructs commitlint it to use the @commitlint/config-conventional configuration and a few rules that will come in handy later:
Install git hooks with husky to run commitlint when a new commit is authored:
npx husky install
Add the commit message hook and add the newly created .husky/commit-msg file to your git repo:
npx husky add .husky/commit-msg 'npx --no-install commitlint --edit'
Add a prepare script to your project’s package.json so that husky will install git hooks when new contributors clone your project and run npm i:
npm pkg set scripts.prepare="husky install"
Congrats! The next time you author a commit the message will need to be prefixed with chore:, fix:, or feat: otherwise, git will throw an error. More information regarding which prefix you should choose when authoring a commit message can be found here.
🚴 Get on the Bike
The next leg of the journey includes setting up our CI/CD pipeline to build our project, and run our tests. For this section, we’re going to assume that you’ve already built an Angular library and are ready to publish. If you don’t already have a library ready to publish feel free to fork ngx-toggle so that you can follow along.
First, let’s add a GitHub Actions Workflow for continuous integration. Add the following snippet to a new file .github/workflows/ci.yml:
For GitHub Actions to run this workflow we’ll need to make a few modifications to our Angular library. Add build:app, build:lib, and build:ci scripts to give the build machine a means to build both the library and the sample:
npm set-script build:app "ng build ngx-toggle-example --configuration=production --base-href=/ngx-toggle/"
npm set-script build:lib "ng build ngx-toggle --configuration=production"
npm set-script build:ci "npm run build:lib && npm run build:app"
We added a --base-href=/ngx-toggle/ argument to the build script so that we can deploy to a subdirectory of our GitHub Pages user site (more on this later).
We also want to distribute the README.md file at the root of our repo along with the library. Let’s install copyfiles and add one more script to copy README.md into our library’s dist directory every time we run build:lib:
npm i -D copyfiles && npm set-script postbuild:lib "copyfiles README.md dist/ngx-toggle"
Next, add a ChromeHeadlessCI browser and customerLaunchers entry in each of your projects’ karma.conf.js files. The following snippet should be put at the top-level of the object that is passed to config.set:
browsers: [
    'Chrome',
    'ChromeHeadlessCI'
],
customLaunchers: {
    ChromeHeadlessCI: {
        base: 'ChromeHeadless',
        flags: ['--no-sandbox']
    }
},
Finally, we need to create test:app test:lib and test:ci scripts in package.json so that we can run our tests on a GitHub Actions-compatible browser without pausing for input or displaying progress:
npm set-script test:app "ng test ngx-toggle-example --no-watch --no-progress --browsers=ChromeHeadlessCI"
npm set-script test:lib "ng test ngx-toggle --no-watch --no-progress --browsers=ChromeHeadlessCI"
npm set-script test:ci "npm run test:lib && npm run test:app"
Now that these scripts have been created the ci.yml workflow action will be run for each pull request to the main branch. It’s recommended you require the CI workflow to run before pull requests can be merged into your default branch. For a quick guide that describes branch protection with status checks please see this article.
🏃 Run to the Finish Line
The final piece of the puzzle is to release our library and sample each time a change is pushed to our default branch. We will use semantic-release-cli to publish our package to npm and our sample to GitHub Pages.
Let’s install semantic-release-cli and a few plugins as dev dependencies:
npm i -D semantic-release-cli [@semantic](http://twitter.com/semantic)\-release/changelog [@semantic](http://twitter.com/semantic)\-release/git
Run semantic-release-cli to start the configuration process:
npx semantic-release-cli setup
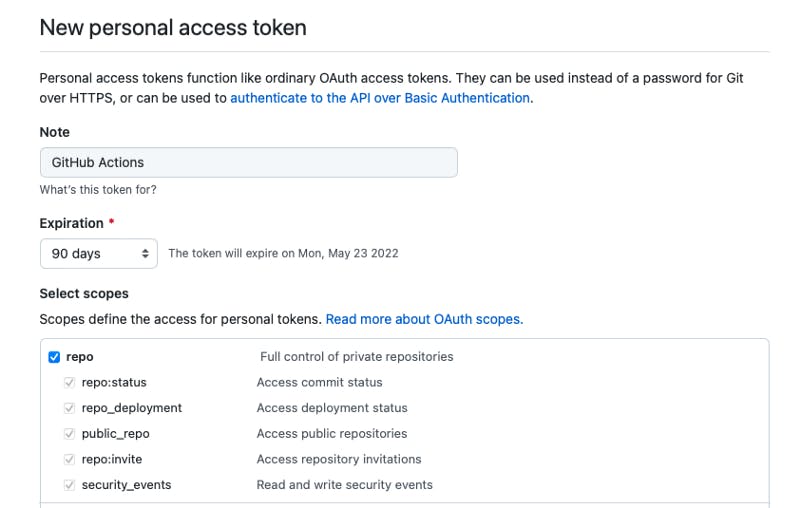
The setup command will prompt you to input your credentials in order to configure your release. You’ll need to generate a GitHub token with the repo scope. Also, you’ll need to ensure your 2-FA settings are set to to auth-only:

Just to be safe, you should change your npm password after entering it into the prompt.
Next, create a .releaserc file at the root of your project so that we can customize semantic-release. We will need to specify the pkgRoot directory for @semantic-release/npm to publish the correct list of files:
We’re going to publish our sample to a sub-directory in a GitHub Pages user site. You can create a GitHub Pages site for your user or organization by creating a new repo with a name username.github.io being sure to replace username with your username or organization name (e.g. bobbyg603.github.io).
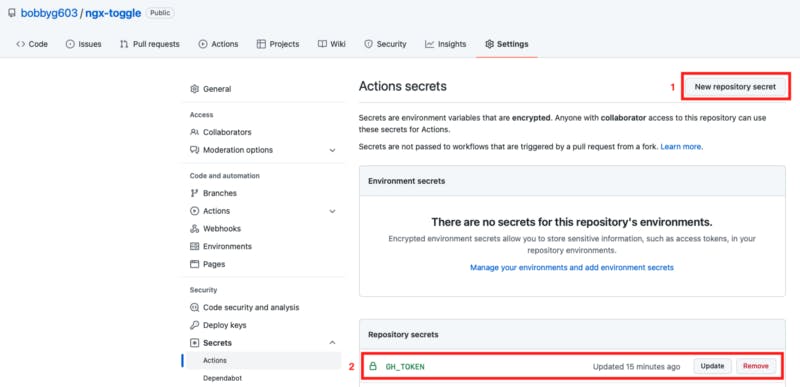
In order to publish to your GitHub Pages user site you’ll need to generate a personal access token with the repo scope. This token will allow GitHub Actions to publish the sample to your username.github.io user site:
Once you’ve generated your token, add a GH_TOKEN repository secret so the personal access token can be used by our deployment workflow.
We now have all the pieces necessary to create our .github/workflows/cd.yml deployment workflow! This workflow will run for every push to our main branch and will publish a new version of our library to npm and copy our sample to our GitHub Pages user site:
Under the Deploy 🚀 step you’ll need to replace the values for repository-name, folder, and target-folder with values that are specific to your GitHub Pages repo and project.
🏁 Celebrate Your Victory!

Congratulations!
You’ve just configured a really powerful CI/CD pipeline for your Angular app! To test the integration, open and merge a pull request to the main branch.
When you open the pull request you should be prevented from merging until the ci.yml workflow has completed successfully.
After merging, the cd.yml workflow should run, create a tag, generate a GitHub release, update CHANGELOG.md, label the pull request as released, and deploy the sample to your GitHub Pages site.
Want to Connect?
If you found the information in this tutorial useful please subscribe on Hashnode, follow me on Twitter, and/or subscribe to my YouTube channel.