

Build .NET Tools in your Garage for Fun and Profit! (📷 valeriiaarnaud)
“We become what we behold. We shape our tools and then our tools shape us.” — Marshall McLuhan
Start Your Engines 🏎️
Productivity is a fickle process that requires focus and persistence. With the complexity in technological systems growing to intractable levels, the last place developers want to experience complexity is in tool configuration. Irrespective of specific tooling choices, the benefits of opting for consistency across your team’s technical stack include improved developer efficiency, natural code reuse, and shared feature ownership.
C# is an immensely popular language and the .NET package ecosystem is massive. With the introduction of MAUI and ASP.NET Core, it’s possible to create full-stack .NET systems that are cross-platform, cloud-native, and highly scalable. If your team is working in C#, .NET tooling is a natural fit.
This tutorial provides an overview of how to create a .NET command-line tool that can be distributed with NuGet and run on Windows, macOS, and Linux.
Go!🚦
Let’s get started by installing .NET 7. Once you’ve installed .NET, test your system by issuing the dotnet --version command in a terminal window.
bobby@mbp ~ % dotnet

Usage: dotnet \[options\]
Usage: dotnet \[path-to-application\]

Options:
\-h|--help Display help.
\--info Display .NET information.
\--list-sdks Display the installed SDKs.
\--list-runtimes Display the installed runtimes.

path-to-application:
The path to an application .dll file to execute.
Create a new console project using the dotnet new command, for our tutorial we’re going to name our project Squeeze.
dotnet new console -n Squeeze && cd Squeeze
Our project will leverage the ZipCreator package. Let’s add this package using dotnet add.
dotnet add package ZipCreator
We will also be using the System.CommandLine package which is in beta. Let’s add this package using the --prerelease option.
dotnet add package System.CommandLine --prerelease
The System.CommandLine package allows you to add type safety to your inputs from the command line. Our example will define 2 arguments, inputFileArg, and outputFileArg, and will define 2 options forceOption, and verboseOption, and a single root command.
var inputFileArg = new Argument(
name: "input",
description: "Zip file manifest containing glob patterns of file paths to include"
);
var outputFileArg = new Argument(
name: "output",
description: "Path to zip file output"
);
var forceOption = new Option<bool>;(
name: "--force",
getDefaultValue: () => false,
description: "Overwrite output file if it exists"
);
var verboseOption = new Option<bool>(
name: "--verbose",
getDefaultValue: () => false,
description: "Show verbose log statements"
);
var rootCommand = new RootCommand("Create a zip via a manifest file containing glob pattern rules");
rootCommand.AddArgument(inputFileArg);
rootCommand.AddArgument(outputFileArg);
rootCommand.AddOption(forceOption);
rootCommand.AddOption(verboseOption);
After defining our arguments and options, we need add a handler that gets called when rootCommand is invoked. The handler is an Action that accepts generic type parameters for the arguments and actions that are added to the root command.
Action<FileInfo, FileInfo, bool, bool> handler = (inputFile, outputFile, force, verbose) =>  {
    // Handler code goes here
};
In this example, our inputFileArg and outputFileArg arguments are both FileInfo objects, and our options forceOption and verboseOption are both Booleans. We are assigning a lambda function to handler.
When handler gets invoked, inputFile and outputFile will be passed an instance of FileInfo created from the string values passed via the command line by the user when they invoke our tool. Similarly, force and verbose will be set to true or false depending on if the --force and/or --verbose flags are present.
To configure our handler we must also call rootCommand.SetHandler and pass it all of the arguments that we want it to have access to.
rootCommand.SetHandler(handler, inputFileArg, outputFileArg, forceOption, verboseOption);
Finally, we will invoke our command with the args passed in via the user when invoking the tool from the command line. Below is a mostly completed Program.cs that demonstrates how to parse a string array of args.
using System.CommandLine;
using ZipCreator;

public class Program
{
    [STAThread]
    static public async Task<int> Main(string[] args)
    {
        var inputFileArg = new Argument(
            name: "input",
            description: "Zip file manifest containing glob patterns of file paths to include"
        );

        var outputFileArg = new Argument(
            name: "output",
            description: "Path to zip file output"
        );

        var forceOption = new Option<bool>(
            name: "--force",
            getDefaultValue: () => false,
            description: "Overwrite output file if it exists"
        );

        var verboseOption = new Option<bool>(
            name: "--verbose",
            getDefaultValue: () => false,
            description: "Show verbose log statements"
        );

        var rootCommand = new RootCommand("Create a zip via a manifest file containing glob pattern rules");
        rootCommand.AddArgument(inputFileArg);
        rootCommand.AddArgument(outputFileArg);
        rootCommand.AddOption(forceOption);
        rootCommand.AddOption(verboseOption);

        Action<FileInfo, FileInfo, bool, bool> handler = (inputFile, outputFile, force, verbose) => {
            Console.WriteLine(inputFile.FullName);
            Console.WriteLine(inputFile.FullName);
            Console.WriteLine(force.ToString());
            Console.WriteLine(verbose.ToString());
        };

        rootCommand.SetHandler(handler, inputFileArg, outputFileArg, forceOption, verboseOption);

        return await rootCommand.InvokeAsync(args);
    }
}
The full code snippet with the handler code is available in the companion repo.
Pit Stop 🔧
Now that we’ve written our tool, let’s run it with VS Code to ensure it works. When you open the folder containing Squeeze.csproj you should see the following prompt.
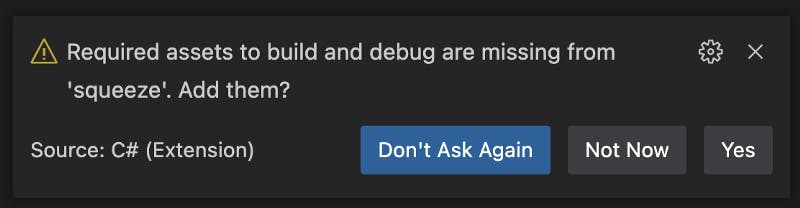
Click the Yes button to add launch.json and tasks.json to the .vscode folder at the root of your repo. If this prompt doesn’t appear you can copy the files from the companion repo.
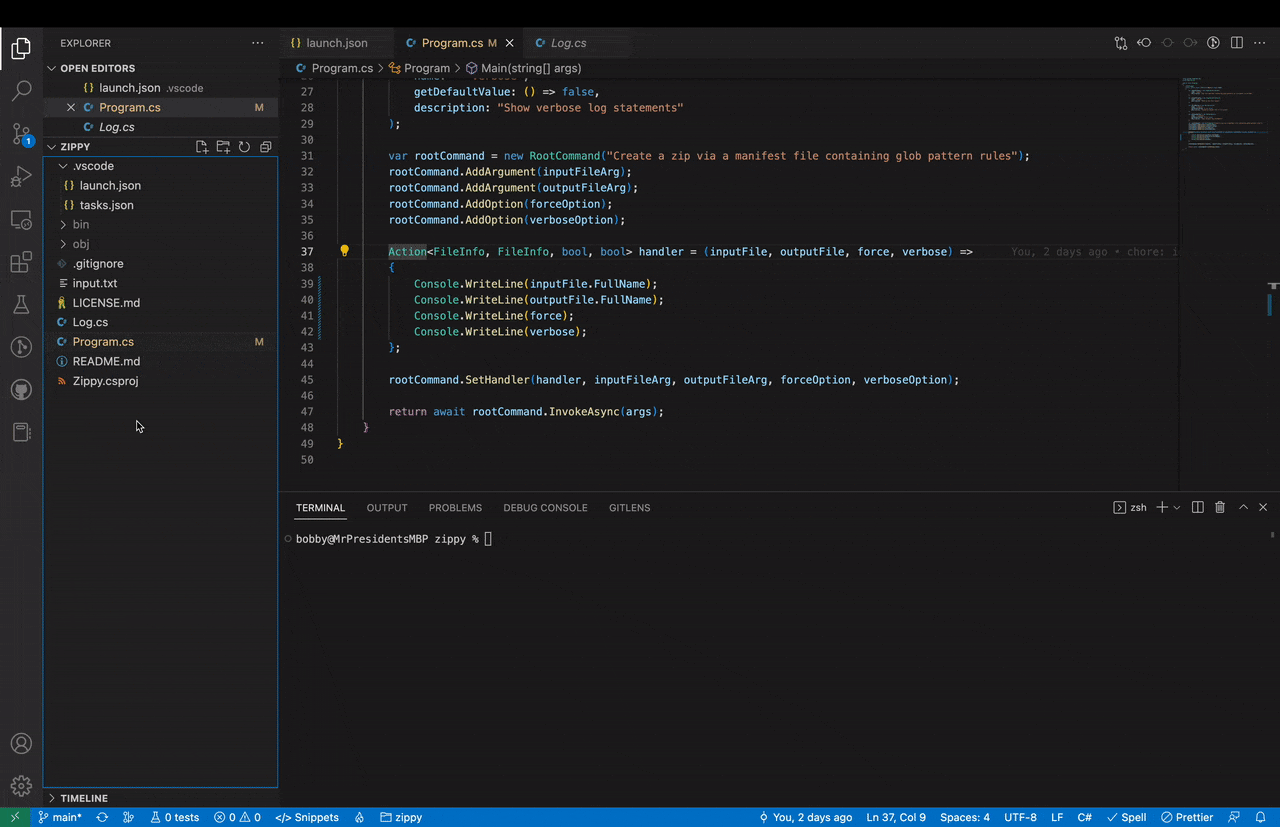
Modify launch.json so that it passes arguments to our program at runtime.
"args": [
    "input.txt",
    "output.zip",
    "--verbose"
]
Set a breakpoint in your handler function and start the debugger.
It works! Let’s publish the tool to NuGet and finish strong.
Final Lap 🏳️
Before we can publish to NuGet we need to create an account and generate an API key by signing in and navigating to the link below.
NuGet Gallery | API Keys
nuget.org
We need instruct the nuget command to pack our project as a tool. Add the following fields to Squeeze.csproj under the <PropertyGroup> section.
<PackAsTool>true</PackAsTool>
<ToolCommandName>squeeze</ToolCommandName>
Use dotnet to pack the project into a .nupkg file.
dotnet pack --configuration Release
Run the following command to push to NuGet! Be sure to replace <Your NuGet API key> with the API key you just created.
dotnet nuget push ./bin/Release/Squeeze.1.0.0.nupkg --source https://api.nuget.org/v3/index.json --api-key
After the package gets indexed it can be installed via dotnet tool install.
dotnet tool install --global Squeeze
The tool will be added to your path, and can be invoked by typing squeeze into the terminal. On Windows you might need to close and re-open your terminal Window to reset your PATH variable.
bobby@mbp % squeeze -h

Description:
Create a zip via a manifest file containing glob pattern rules

Usage:
Squeeze [options]

Arguments:
Zip file manifest containing glob patterns of file paths to include
Path to zip file output

Options:
--force Overwrite output file if it exists [default: False]
--verbose Show verbose log statements [default: False]
--version Show version information
-?, -h, --help Show help and usage information
Victory Lap 🏁
You’ve successfully published a .NET tool to NuGet — well done!
If you’re interested in a bit of extra credit, try creating an Azure CI/CD Pipeline that automatically increments the version, and publishes your package.
Want to Connect?
If you found the information in this tutorial useful please subscribe on Hashnode, follow me on Twitter, and/or subscribe to my YouTube channel.
Thanks for reading!