How To Build a Linux Shared Library
Harness the Power of Modular C++ and Open-Source

Photo by Alex Block on Unsplash
Definition
“A library is… a collection of implementations of behavior, written in terms of a language, that has a well-defined interface by which the behavior is invoked. For instance, people who want to write a higher-level program can use a library to make system calls instead of implementing those system calls over and over again. In addition, the behavior is provided for reuse by multiple independent programs.” — Wikipedia
Why
Linux is arguably the top dog in the open-source world. According to Wikipedia, approximately 80% of servers on the internet run some form of Linux/Unix. More projects than ever are built with Linux support in mind. Contributing to and extending from open-source projects are the most powerful ways to develop high-performance software applications quickly. This article will cover the basics of Linux C++ shared library development and give you a starting block and help you jump into the open-source world.
A companion repo for this article can be found on GitHub.
How
To get started with Linux development, you’ll need to choose a distribution and install it on hardware or as a virtual machine. For this tutorial, we will be using Ubuntu Linux 22.04. We will also be using VS Code installed via Ubuntu’s Snap Store, which makes it much easier to download and install commonly used software. Not too long ago, the only way to install software on Ubuntu was manually via terminal commands!
Despite installing software via the terminal being a bit of a drag, the terminal is an essential tool for software developers. Using the terminal, in combination with hotkeys, allows you to move faster by keeping your hands on the keyboard.
Create a new project in VS Code
To quickly open the terminal, press the ⊞ Win key or ⌘ Cmd on Mac keyboards and type terminal + Enter. Once you’ve opened a terminal, let’s start by creating a new directory for our project on our Desktop, which is a subdirectory of our ~ (Home) directory:
mkdir ~/Desktop/linux-shared-library
Let’s use the terminal to open our new project directory in VS Code. We can use the bang command shortcut !$ to automatically grab the ~/Desktop/linux-shared-library portion of the above command and pass it to code. Here’s how to do it:
code !$
Boom! You should now have a VS Code window and are ready to rock!
VS Code has a terminal built into it for easy access; this terminal can be toggled automatically via Ctrl + ~.
Write the main program
Open the VS Code integrated terminal and create a new file C++ file:
code main.cpp
Write the following code in your new file:
Let’s compile and run the code you just wrote. We will be using the gcc compiler that ships as part of Ubuntu. Here’s how to install it:
gcc main.cpp
The command above will generate a file a.out which will output “Hello Earth!” to the terminal when it’s run via typing ./a.out in the VS Code terminal:
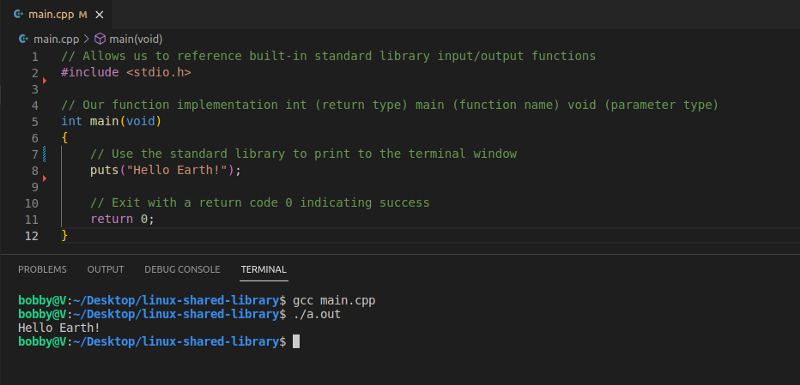
Congratulations! You’ve just successfully compiled and run a C++ program! Next, let’s figure out how to write code that we can share with the world!
Write the shared library
Create a new file via the VS Code terminal:
code mars.cpp
Write the following code in your new file:
Let’s also create a C++ header file. The header file is where we will define which functions our shared library will expose to its consumers:
code mars.h
Add the following to mars.h:
Let’s compile our code into a shared library so that it can be used by main.cpp! This can be done in two steps: first, let’s compile the code in mars.cpp as Position Independent Code so that it can be added to a shared library:
gcc -c -fpic -o mars.o mars.cpp
This creates a mars.o object file. Let’s take this object file and use it to create our shared library:
gcc -shared -o libmars.so mars.o
Nice! Now we can use it in our main program!
Integrate the library
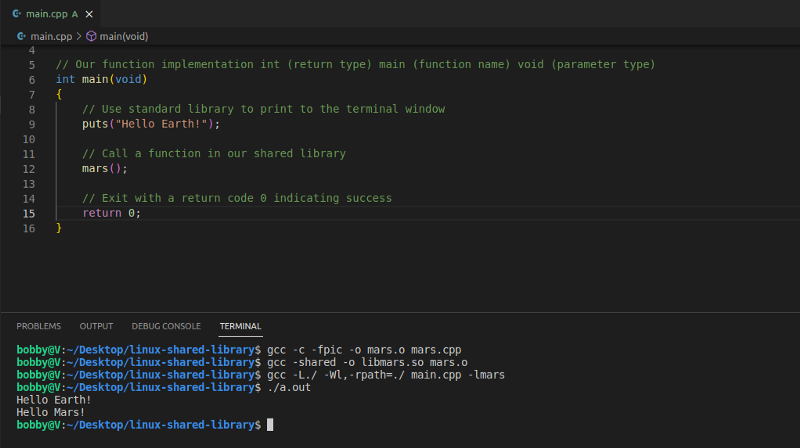
Let’s add the following to main.cpp:
Almost there! Let’s compile our main program and tell it to link with the mars library. Our compiler, gcc, assumes that the file names of shared libraries are all prefixed as lib, so we will specify we’d like to link with libmars.so by specifying -lmars:
gcc main.cpp -lmars
Oops! We have to tell gcc where to find libmars.so. Let’s try again with the -L argument that specifies where our library is located. We can tell gcc the file is available in the current directory by passing ./:
gcc -L./ main.cpp -lmars
Home stretch! Let’s run the compiled program:
./a.out
Ack! Our program can’t load the shared library we created! This is because we need to specify where to load the shared libraries from with -Wl,-rpath:
gcc -L./ -Wl,-rpath=./ main.cpp -lmars
You did it! Run the compiled program and verify that your output matches the following:
Thank you for reading!
References
https://www.cprogramming.com/tutorial/shared-libraries-linux-gcc.html
http://www.microhowto.info/howto/build_a_shared_library_using_gcc.html
Want to Connect?
If you found the information in this tutorial useful, please follow me on Twitter or visit my YouTube channel.


