Getting Started With Unit Testing Software in 2023
Develop top-notch software at ludicrous speeds


Image of a Developer Supporting a Well-Tested Repository (📷 lassedesignen)
Testing for Fun and Profit
Unless you’ve been living with your thumbs in your ears humming La Macarena for your entire life, you’ve probably heard how important it is to test your software.
If you haven’t heard that testing software is important, you might need better friends!
This article will explore the why and how of testing software so that you can spend less time breaking things and more time dancing and making new friends.
A companion repository for this article can be found via the link below.
Why Should I Write Tests?
Writing tests is the best way to wrangle the complexity of growing applications. Here’s a rapid-fire list of reasons why you should add tests to your application:
Tests provide living documentation on how the code works so that you don’t have to depend on fuzzy memories and poor assumptions.
Writing tests requires writing testable code which encourages good software architecture patterns.
Automated tests can be executed orders of magnitudes faster than the equivalent manual testing and can be added to automated build checks for pull requests to ensure contributions don’t break existing functionality.
The nicest thing you can do for any new contributor is to introduce them to a codebase that is well-architected, well-documented, and well-tested.
A large suite of well-written tests that execute quickly and accurately capture regressions in code behavior allows teams to operate efficiently with processes that scale effectively.
Setting Up a New Project
Fire up your development environment of choice. This article will focus on VS Code but any reasonable IDE will suffice. You will also need Node.js. At the time of writing the current LTS version is 16.13.1.
First, let’s initialize a new Node.js project
npm init
Let’s install all the packages needed to bootstrap a TypeScript project. In this tutorial, we’re going to use the Jasmine testing framework.
Our example will also be using node-fetch. I won’t get into specifics here, but Node modules can be a total dumpster fire so we’re going to keep node-fetch on major version 2.
npm i typescript ts-node jasmine @types/jasmine node-fetch@^2.0.0 @types/node-fetch@^2.0.0
Let’s configure Jasmine. At the root of your project create a file jasmine.json. Paste the following into the JSON file:
{
    "spec\_dir": "src",
    "spec\_files": ["**/*[sS\]pec.ts"],
    "helpers": ["helpers/**/*.ts"],
    "random": true,
    "stopSpecOnExpectationFailure": true
}
I like to define tests right next to the code they’re testing and therefore you’ll notice that the spec_folder property points to src which is also where we’re going to put our source.
Add the following script to your package.json file:
"scripts": {
    "test": "ts-node node_modules/jasmine/bin/jasmine --config=jasmine.json"
},
To view your tests in the VS Code Test Explorer UI, you’ll need to install the Jasmine Test Explorer extension.
Once you’ve installed the extension, create a new file .vscode/settings.json ensuring you create the .vscode folder if it doesn’t already exist.
Paste the following contents into settings.json in order to configure Jasmine Test Explorer it to work with our TypeScript settings:
{
    "testExplorer.useNativeTesting": true,
    "jasmineExplorer.config": "jasmine.json",
    "jasmineExplorer.nodeArgv": [
        "-r",
        "ts-node/register",
    ]
}
How Do I Write Tests?
Before you can write tests you need something to test. Let’s go through the exercise of creating a simple service that returns a URL to a random image of a dog given a specified breed.
Create a new file src/dog.service.ts and paste the following snippet in that file:
import fetch from "node-fetch";

export class DogService {
    async getDogImageUrl(breed: string): Promise {
        const response = await fetch(`https://dog.ceo/api/breed/${breed}/images/random`);
        const json = await response.json() as DogResponse;
        return json.message;
    }
}

export interface DogResponse {
    status: 'success' | 'error';
    message: string;
}
It seems reasonable that we might want to ensure that our function isn’t passed an empty string. Let’s add a guard that will throw if the breed string is null or empty.
import fetch from "node-fetch";

export class DogService {
    async getDogImageUrl(breed: string): Promise<string> {
        if (!breed) {
            throw new Error('Must specify a valid doggo!');
        }

        const response = await fetch(`https://dog.ceo/api/breed/${breed}/images/random`);
        const json = await response.json() as DogResponse;
        return json.message;
    }
}
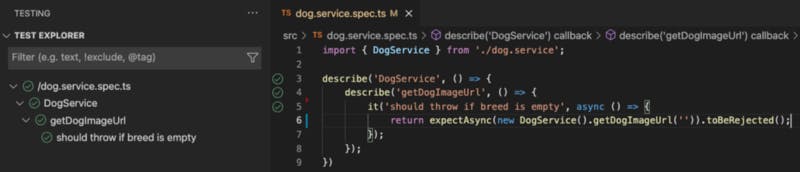
Let’s add a test that exercises the guard clause. Create a file dog.service.spec.ts in the src folder. In your new spec file paste the following contents:
import { DogService } from './dog.service';

describe('DogService', () => {
    describe('getDogImageUrl', () => {
        it('should throw if breed is empty', async () => {
            return expectAsync(new DogService().getDogImageUrl('')).toBeRejected();
        });
    });
});
This test should show up in your Test Explorer UI. Let’s run it!
You should also be able to set a breakpoint and stop the debugger on the desired line if you right-click a test in the list and choose Debug Test.
Diving Deeper
So far we’ve written a very simple test, let’s turn it up a notch and explore some more advanced concepts. It seems reasonable to test that we call fetch with a string containing the breed that we passed to getDogImageUrl.
Testing that we’re calling fetch correctly is going to require us to re-architect our function a bit. We need to introduce a seem that allows us to swap the real fetch implementation with a mocked version that allows us to inspect the way fetch was called. A common method for making code testable is to introduce dependency injection.
There are 3 types of dependency injection: constructor, parameter, and property injection. Constructor injection makes the most sense when most of the functions in an object use a specific dependency. When only one function uses a dependency, injecting the dependency as a parameter to the function is an acceptable option. The third approach is to use property injection. Property injection makes sense when a class has a reasonable default dependency that rarely needs to be substituted.
In our example, constructor injection makes the most sense, but for fun let’s go through all 3.
Creating a Fake Implementation
Before we get to our dependency injection examples let’s create a fake implementation that we can use to verify the surrounding implementation is working correctly.
Let’s add a beforeEach block to dog.service.spec.ts that configures a Jasmine Spy. Spies are functions that can track they way they were called, and return a preconfigured value. Our spy will mimic the return value from the dog.ceo API.
let fetch: jasmine.Spy;
let message: string;

beforeEach(() => {
    const status = 'success';
    message = 'https://images.dog.ceo/breeds/pug/n02110958_12589.jpg';
    fetch = jasmine.createSpy();
    fetch.and.resolveTo({
        json: async() => ({
            status,
            message
         })
    });
});
Constructor Injection
Constructor injection is the most preferable approach and frameworks often provide tooling to make this easy. Let’s modify dog.service.ts so that we can inject our fake fetch implementation into the constructor.
import { RequestInfo, RequestInit, Response } from "node-fetch";

export class DogService {
    constructor(private _fetch: Fetch) { }

    async getDogImageUrl(breed: string): Promise {
        if (!breed) {
            throw new Error('Must specify a valid doggo!');
        }

        const response = await
        this._fetch(`https://dog.ceo/api/breed/${breed}/images/random`);
        const json = await response.json() as DogResponse;
        return json.message;
    }
}

export type Fetch = (url: RequestInfo, init?: RequestInit) => Promise;
Notice we define an interface for our parameter. This interface was copied from the node-fetch declarations file so our DogService class can specify exactly what it needs.
Let’s write a test to verify we’re using fetch correctly in getDogImageUrl:
it('should call fetch with url containing breed', async () => {
    const breed = 'pug';

    await new DogService(fetch).getDogImageUrl(breed);

    expect(fetch).toHaveBeenCalledWith(jasmine.stringMatching(/pug/));
});
Parameter Injection
In some circumstances, it might make sense to inject a dependency via a function parameter. Here’s an example of what that would look like (you’ll need to copy the type declaration for Fetch from the constructor injection example):
async getDogImageUrl(fetch: Fetch, breed: string): Promise<string> {
    if (!breed) {
        throw new Error('Must specify a valid doggo!');
    }

    const response = await fetch(`https://dog.ceo/api/breed/${breed}/images/random`);
    const json = await response.json() as DogResponse;
    return json.message;
}
Your test will now look as follows:
it('should call fetch with url containing breed', async () => {
    const breed = 'pug';

    await new DogService().getDogImageUrl(fetch, breed);

    expect(fetch).toHaveBeenCalledWith(jasmine.stringMatching(/pug/));
});
Property Injection
Property injection used to be an approach I stayed away from. With TypeScript, I’ve changed my mind. If you’re using a framework that automatically injects dependencies you should almost always use this over property injection. Let’s try property injection with a little twist.
import fetch from 'node-fetch';

export class DogService {
    private _fetch: Fetch = fetch;

    async getDogImageUrl(breed: string): Promise<string> {
        if (!breed) {
             throw new Error('Most specify a valid doggo!');
        }

        const response = await this._fetch(`https://dog.ceo/api/breed/${breed}/images/random`);
        const json = await response.json() as DogResponse;
        return json.message;
    }
}
You might have noticed that _fetch is private. This was done on purpose. This is because, in a production scenario, we never want to let anyone swap out this dependency. What we’re doing by making this private is making it explicit that we don’t intend for anyone to overwrite this dependency.
TypeScript allows us to do some really interesting stuff. The following trick is something I recommend you never do in production code. However, for testing purposes this is a reasonable trick to have in your toolbelt:
it('should call fetch with url containing breed', async () => {
    const breed = 'pug';
    const service = new DogService();
    (service as any)._fetch = fetch;

    await service.getDogImageUrl(fetch, breed);

    expect(fetch).toHaveBeenCalledWith(jasmine.stringMatching(/pug/));
});
By casting our service as any we can silence TypeScript warnings about accessing a private property and do our property injection anyway. You also could have used a public property, but that signals that you intend for consumers to override the property in the production code which doesn’t make much sense in this example.
This article provided an overview of why you should test your software and provided a basic example of how to get started.
Want to Connect?
If you found the information in this tutorial useful please subscribe on Medium, follow me on GitHub, and/or subscribe to my YouTube channel.