RxJS in the Wild: How to Create Pop-up Alerts
Create simple, beautiful pop-up alerts with RxJS and Angular
RxJS in the Wild: How to Create Pop-up Alerts (📷 Eric Gevaert)
The Modern Tutorial 🐈
The tutorial is a stunning creature capable of transferring great swaths of information across oceans, mountains, chasms, and deserts. Regrettably, the modern tutorial is often born in captivity; a sterilized environment divorced from nature and void of real-world application. Once in a while, however, a tutorial is captured from the wild and transferred to Hashnode while retaining its full majesty.
Alerts 📢
Providing feedback to the user is important to delivering a good user experience and displaying alerts is an integral part of most web applications. It’s important to let the user know when a long-running action succeeds, or the application malfunctions, so that they can react accordingly.
This article was inspired by the Alert control we use at BugSplat to display alerts when settings are updated, or when something went wrong when performing network calls.
In this tutorial, we’ll build a beautifully simple Alert system using Angular, Bootstrap, and RxJS. A companion repo for this article can be found on GitHub and on StackBlitz.
Alert Service
Our Alert system needs a way to keep track of all the alerts displayed to the user. We need to allow the user to dismiss alerts, and we also want to allow certain alerts to disappear automatically.
Our Alert Service is a stateful service that contains an observable array of alerts$ to be displayed by the Alert Component. We need ways to push alerts, dismiss alerts, and dismiss alerts after a timeout if the alert should be dismissed automatically:
We keep an array of alerts in _state. We expose an alerts$ observable that emits every time _state is updated. We save the result of this._alertSubject.asObservable() as a private field so that we don’t expose the subject to the consumer directly, and so we don’t create a new observable for every call to get alerts$.
The functions dismissAlert, pushAlert, and pushErrorAlert add and remove values from _state and tell _alertSubject to emit a new event with the updated state. To automatically dismiss the alert, we create a promise using firstValueFrom with timer to call this.removeAlert(alert.id) after the specified time has elapsed.
Alert Component
We need to display the alerts to the user so that they can be easily noticed and dismissed after they’ve been acknowledged. Alerts are commonly displayed on either the top or bottom of the screen and overlay the rest of the application's contents.
Our Alert Component needs to display each alert with the appropriate message and color. The alerts need to be clickable by the user so that they can be dismissed accordingly.
Our Alert Component template uses *ngFor and the AsyncPipe to display an array of alerts and their corresponding messages. We used the alertColorClassName pipe to transform the Alert.color property into a Bootstrap class name. Finally, we call onRemoveAlertClick when the user clicks the alert.
In the Alert Component styles, we add @media queries to display the alert with a width of 500px on large screens, and a width of 100% on small screens. We also make the cursor a pointer to convey to the user that the alert can be dismissed by clicking it anywhere. We also remove some of the default ul styles so that we can display the alerts in neat rows.
The code that backs the Alert Component is very simple, it exposes an alerts$ observable that emits a new value from the Alert Service. When the user clicks the Alert we call the onRemoveAlertClick handler which calls dismissAlert on the Alert Service.
App Component
To display the Alert Component as an overlay for the entire App we simply add the Alert Component to the App Component template. We also want a few buttons to test different types of errors, as well as a toggle switch that allows us to determine if new alerts should be dismissed automatically.
Last but not least, we need to use the code in the App Component to call pushAlert when onShowAlertClick is called to create alerts and display them to the user. We also need to expose the autoDismiss property to the template so that it can be used in a 2-way binding with the NgxToggle Component.
App Component
Congratulations 🎉
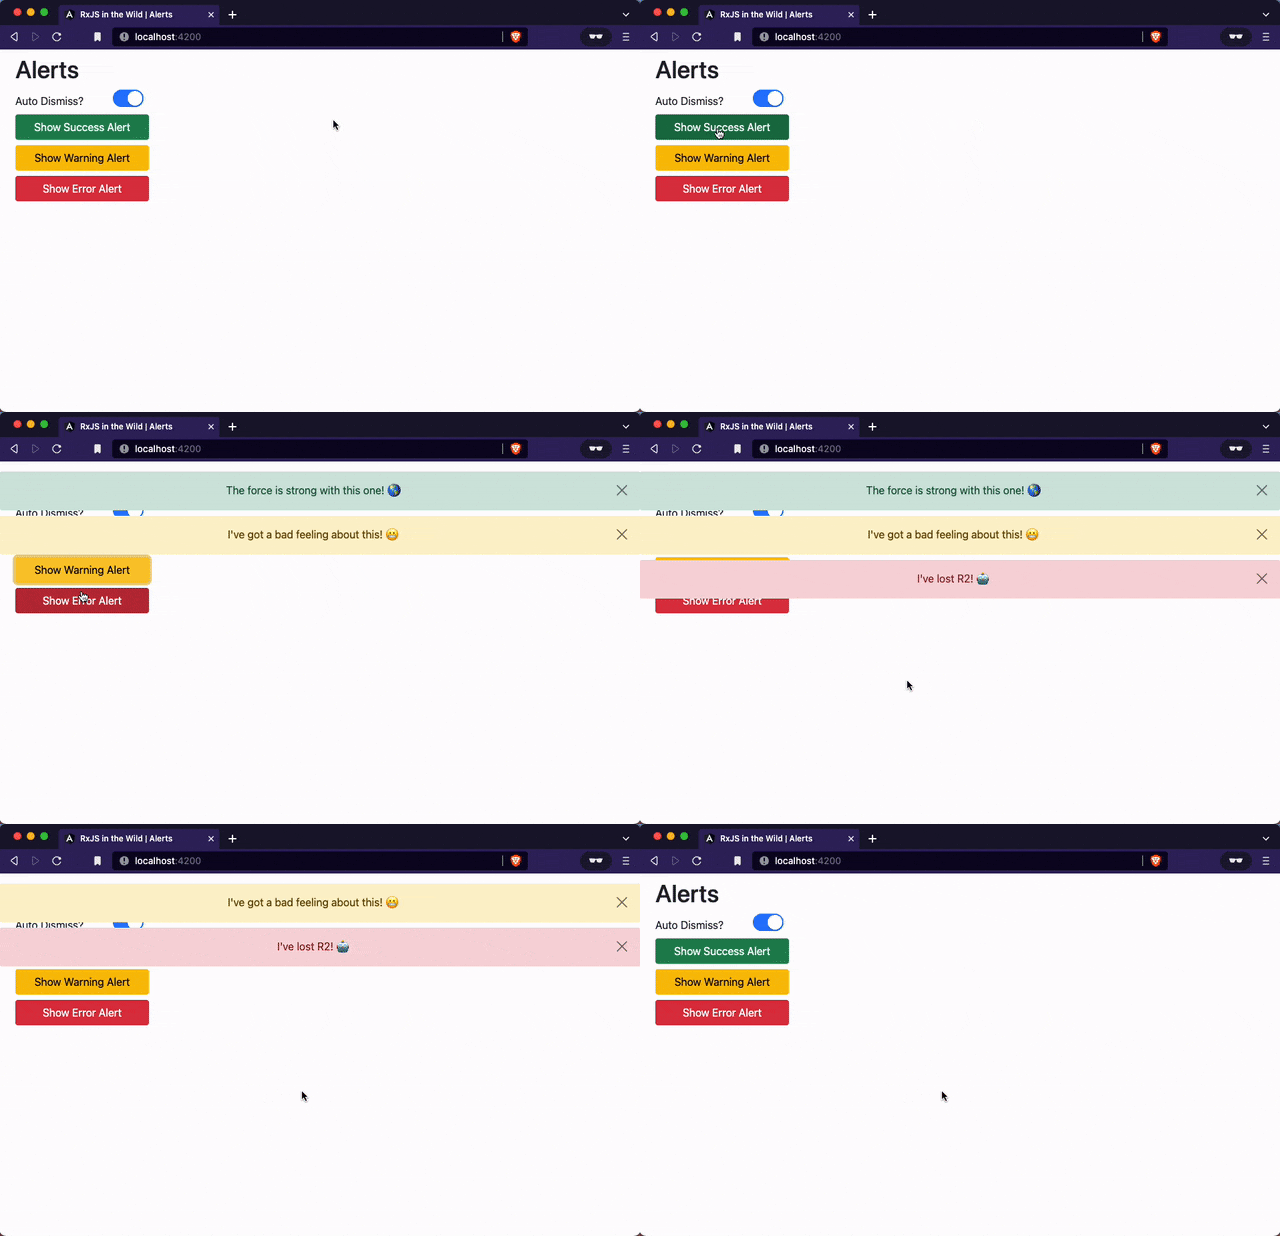
In this tutorial, you learned how to make a simple, elegant Alert component using RxJS, Angular, and Bootstrap. If you did everything correctly you should have something that resembles the following:

Thanks for reading! If you found this article interesting you might also enjoy CI/CD for Angular Developers, or File Uploads with Angular and RxJS.
Want to Connect?
If you found the information in this tutorial useful please subscribe on Medium, follow me on GitHub, and/or subscribe to my YouTube channel.